Disclaimer: Our content doesn't constitute medical or fitness advice. We may be earning money from companies & products we review. Learn more

Table of Contents
What is a Back Lever?
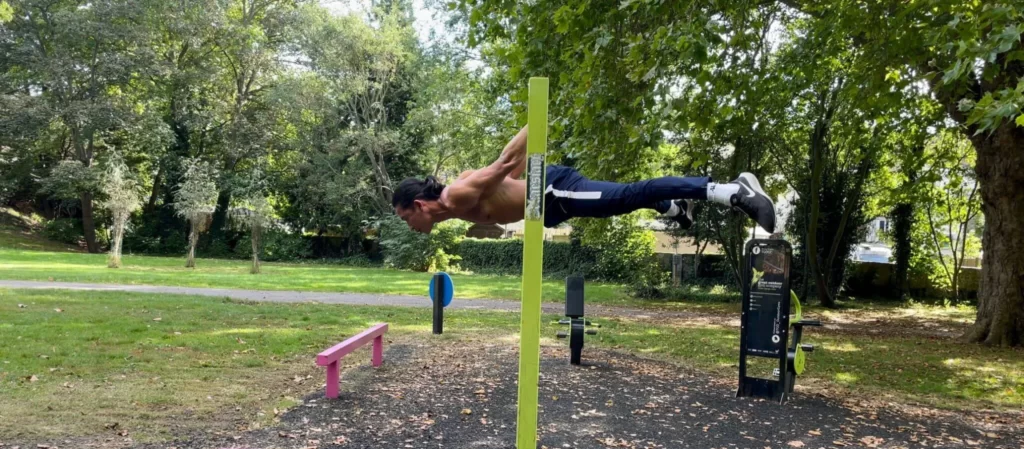
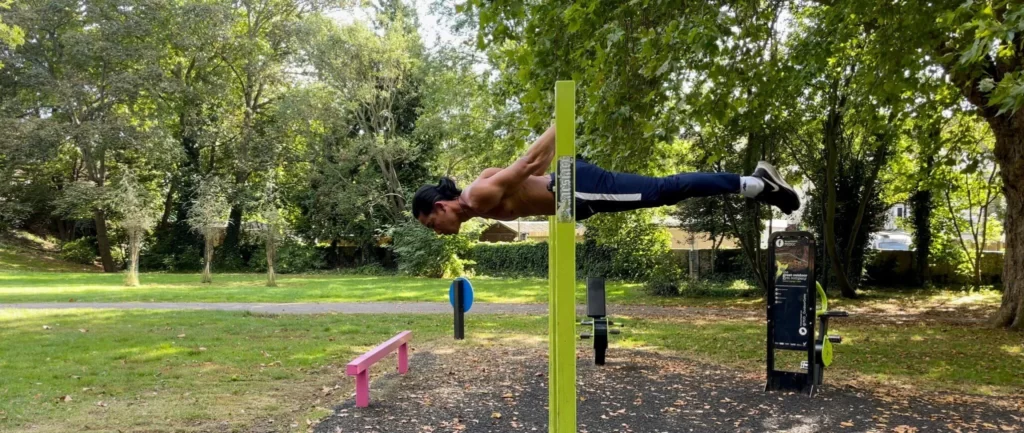
The back lever is static every calisthenics enthusiast should strive to achieve. It will develop complete upper body strength as you’ll have to squeeze every muscle in your body to hold a good-looking back lever. This skill produces a large amount of core tension and displays imposing bodily control and can be performed from a straight bar, gymnastic rings, or parallel bars.
According to the Gymnastics Code of Points, the back lever is ranked as an ‘A’ in terms of difficulty, with rank ‘F’ being the most difficult skill to execute. This shows that the back lever is at the bottom of the ranking in terms of difficulty. Therefore, with this in mind, you can definitely achieve it!
Back Lever Muscles Worked
The back lever targets your lats, lower back, core, hips, biceps, and glutes. Many muscles are being heavily utilized here to perform a solid hold. The primary muscles worked are the abdominals, latissimus dorsi, and erector spinae. The secondary muscles worked are the anterior deltoids, pectoralis major, forearms, biceps, and glutes.
What Level is the Back Lever?
The back lever is an advanced level exercise as you are required to have a solid foundational strength such as being able to readily do pull-ups, dips, push-ups, and core exercises such as the hanging leg raise. Having a solid base in these calisthenics fundamentals will help you to fast-track your calisthenics journey to achieving awesome skills such as the back lever.
If you do not yet have sufficient fundamentals strength, don’t worry, we have covered how to improve these foundations in full detail, and you can check them out by clicking the links for each exercise: pull-ups, dips, push-ups, and core. Also, I highly recommend you to immerse yourself with calisthenics fundamentals as they will ensure you’ll have solid foundations for advanced skills, and, this will reduce the likelihood of injury. Read this How To Start Calisthenics: A Beginner’s Guide (2022).
Back Lever Progressions
Depending on your current strength, you may need to start on different progressions during your back lever journey. Everyone must go through these stages to know where they currently stand and what is the next progression that is yet to be unlocked. You should practice these progressions in every session of your back lever training.
Your goal is to be able to hold each progression for a minimum of 10 seconds for 3 sets with good form before moving on to the next progression. Don’t rush the process but rather embrace the journey, enjoy the process, and make that 1% improvement every day. The progressions are:
- Skin The Cat
- Tuck Back Lever
- Advanced Tuck Back Lever
- One-Leg Back Lever
- Advanced One-Leg Back Lever
- Straddle Back Lever
- Back Lever
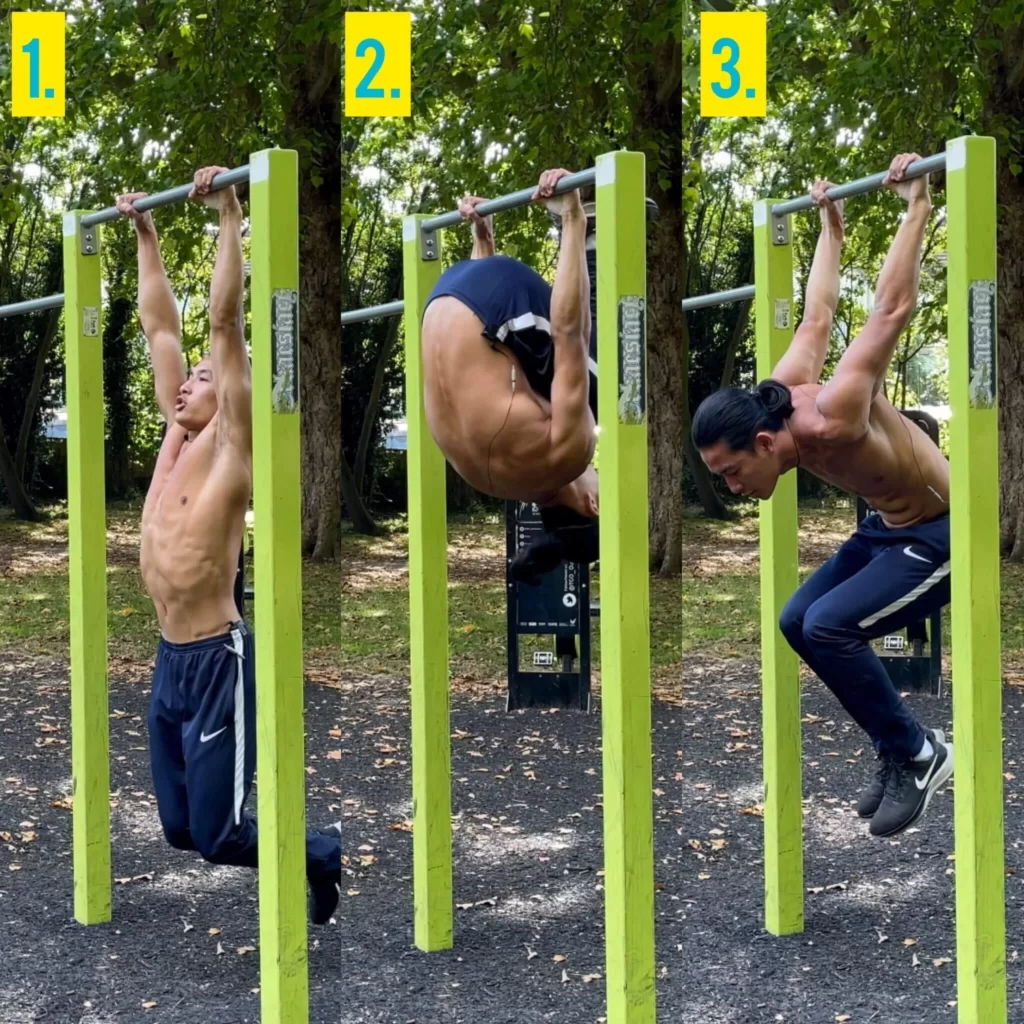
Skin The Cat
Skin the cat is a conditioning exercise that develops your core strength, back muscles, and shoulder mobility. You will hang from a bar or gymnastics rings followed by looping your legs between your arms and overhead into a pike inverted hang position. Every time you loop your legs over counts as a single rep, practice it in a slow and controlled manner (2 seconds over, and 2 seconds back). Perform this between 1-5 reps for 4 sets, 3 times a week.
Tuck Back Lever
The tuck back lever is one of the earlier progressions that will develop your upper body strength, especially in the lats and core. To do this you will grab the bar using a pronated grip, and perform a partial skin the cat by tucking your knees in towards your chest and looping your body back through your arms. Lower yourself until your back is parallel with the ground. Keep your neck in a neutral position and look down. Hold this position between 5-20 seconds for 5 sets, 3 times a week.
Advanced Tuck Back Lever
The advanced tuck back lever will put greater emphasis on your core and hips as you will be getting into a tuck back lever position, followed by extending your knees back to create a 90 degrees angle in relation to the torso and thighs. Focus on scapular retraction, keeping your knees together, and squeezing your legs. Hold this position between 5-20 seconds for 5 sets, 3 times a week.
One-Leg Back Lever
Awesome! In this progression, your body shape will look more like a back lever. You will get into a tuck back lever position, followed by extending one leg out fully to create a horizontal line with your body. Focus on engaging your glutes, hamstrings, and pushing your hips down to ensure a good line. When you initially move on to this progression, your body alignment may be in a banana shape, but don’t be discouraged as this is normal! Give it time and it will surely improve. Hold this position between 5-20 seconds for 5 sets, 3 times a week, practice on both legs in a single set.
Advanced One-Leg Back Lever
The advanced one-leg back lever is approximately the halfway point during your journey. From this point onwards, you should progress relatively quickly if you keep drilling down these progressions. Begin in a one-leg back lever position, followed by extending the tucked knee backward to form a 90 degrees angle between the thigh and torso. You will feel more resistance being placed on your core. Hold this position between 5-20 seconds for 5 sets, 3 times a week, and practice on both legs in a single set.

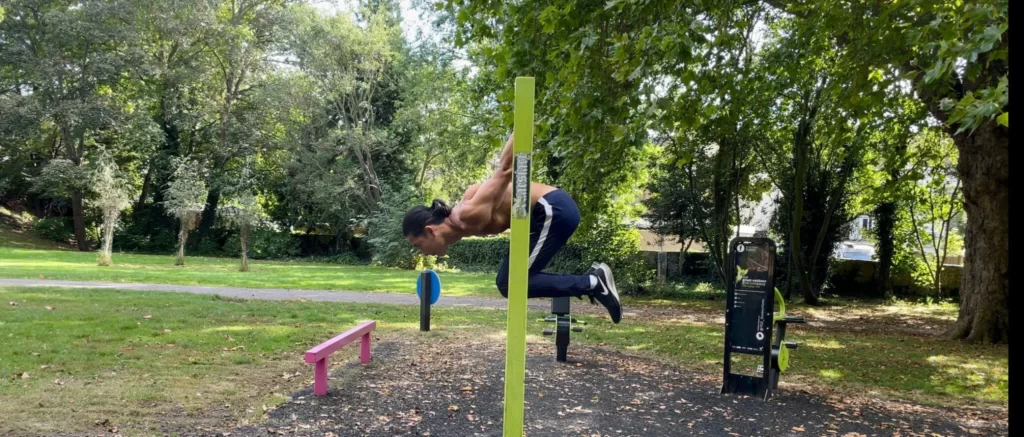
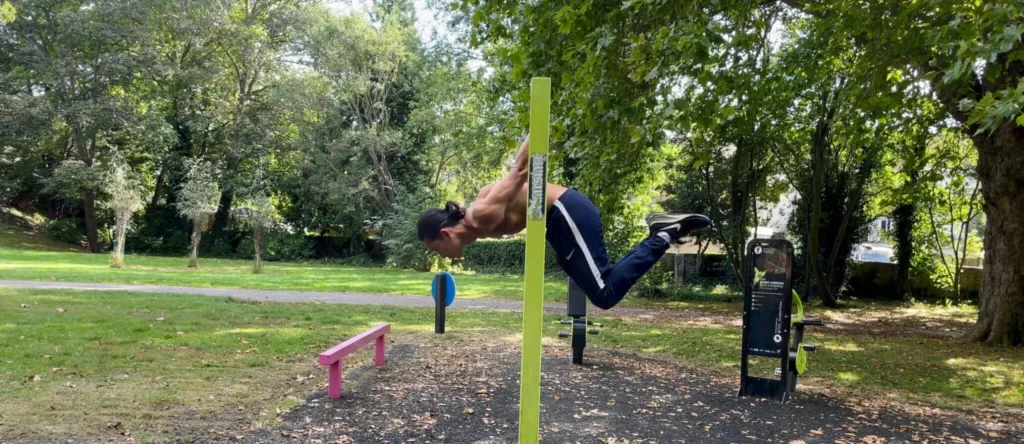
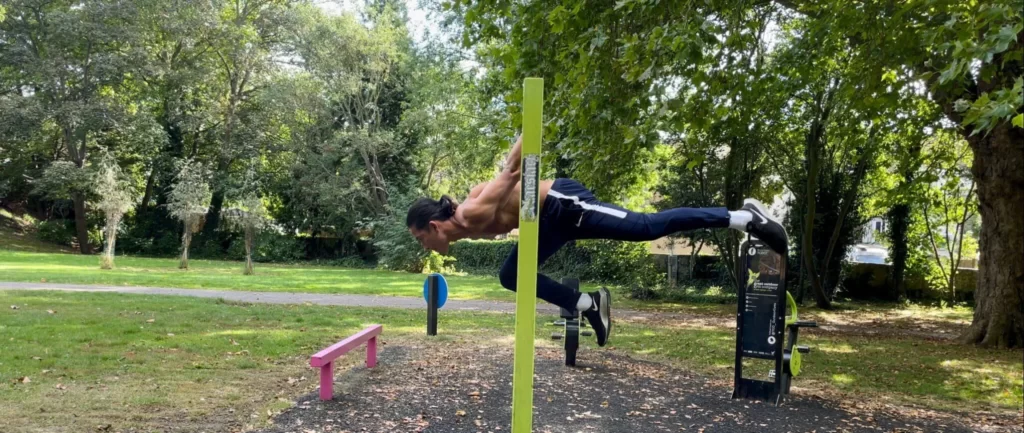
Straddle Back Lever
In this progression, you are about 80% through your journey and the shape is looking more like a back lever. This exercise will require you to loop your legs over your arms until your head is facing the ground with your legs overhead. Extend your legs out to form a straddle, with toes pointed, glutes, quads, and core engaged – very, very important!
In this inverted straddle position, you will gradually lower down until your body is parallel to the ground. Initially, your body shape may not be straight, and your hips are sagging down. The famous banana shape takes form! But, with enough practice, your alignment will improve. Hold this position between 3-15 seconds for 5 sets, 3 times a week.
Back Lever
Finally, you are at the point of your goal, the full back lever hold! Congratulations on reaching this stage. With enough practice using the straddle back lever and one leg back lever, your body should be well conditioned to keep your legs together as slowly descend into a back lever hold. Your body should be straight and parallel to the ground. Again, initially, the banana will take place, but with practice, your body will adapt to the position and straighten itself out! Hold this position between 3-15 seconds for 5 sets, 3 times a week.
Back Lever Supporting Exercises
With the progressions explained, another important point you need to know is that you must also practice supporting exercises along with the back lever progressions. These two groups go hand in hand and will condition your muscles, joints, and tendons to further advance your progress towards unlocking this skill. The supporting exercises are:
- Pull-Ups
- Hanging Leg Raises
- Back Lever Kicks
- Back Lever Negatives
Pull-Ups
the pull-up is one of the fundamentals that every aspiring calisthenics athlete should master, they will strengthen your lats, along with developing your scapular retraction, which is essential for holding the back lever. When doing pull-ups, you should keep your core tight throughout the movement, and make sure you lock your arms out fully before performing the next rep to ensure a full range of motion.
It is highly recommended that you include pull-ups as the last exercise in your sessions as this will take a lot of energy from you and create fatigue in your muscles. Therefore, it is important to practice the progressions first, and pull-ups last. Perform this between 5-20 reps for 4 sets, 2 sessions a week.

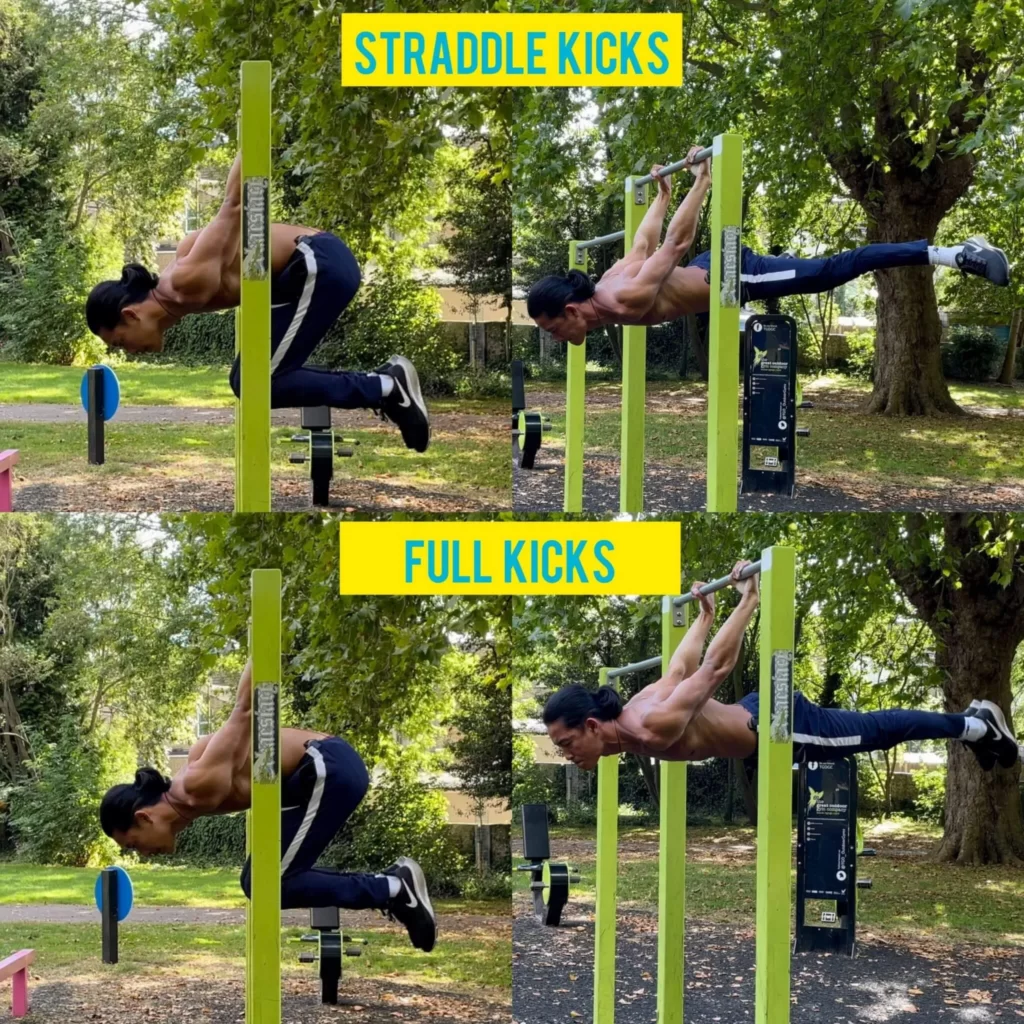
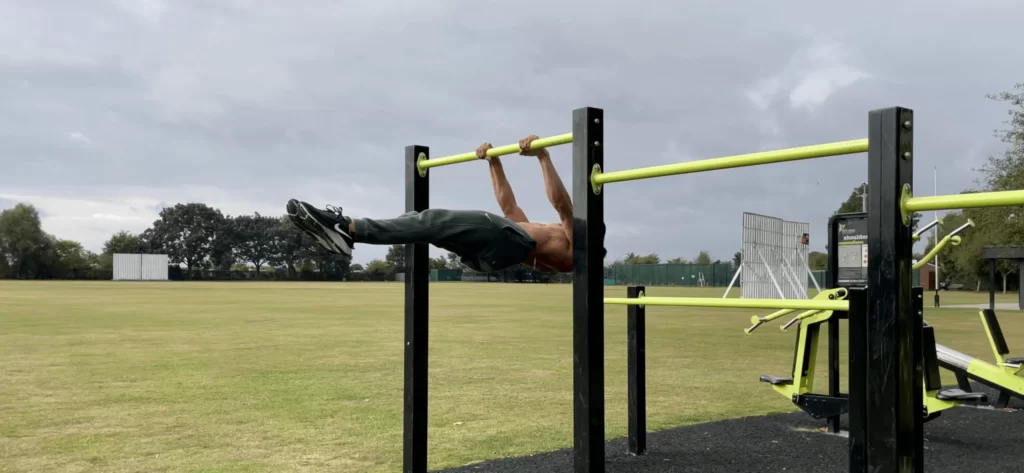
Back Lever Kicks
Back lever kicks are great for strengthening your core and lower back muscles to assist in proceeding to the next progression. You will utilize this exercise once you are at the one leg back lever stage, as you will alternate between kicking one leg out whilst having one leg tucked in towards your chest. Practice this between 4-10 kicks for 4 sets, 2 sessions per week.

This exercise is adaptive to your strength, which means that you have moved on from the one leg back lever to the straddle back lever phase, you can do straddle kick-outs, and eventually, progress to the full back lever kick-outs. Practice this between 4-10 kicks for 4 sets, 3 sessions per week.
Back Lever Negatives
The back lever negative is a great exercise that utilizes the eccentric movement, where you will slowly lower your body down from a top position at a count of 3-5 seconds whilst keeping your body tensed. This will fatigue your muscles, causing them to adapt to the new movement and grow. To perform this you will get into an inverted back lever position (can be done in tuck, one leg, straddle, or full back lever form), where your head is facing the ground and your legs are overhead.
According to a 2014 study by the Journal of Applied Physiology, eccentric training can further advance maximal muscle strength and power. It can maximize muscle length for the greatest tension development at a higher degree of extension.
Initially, when performing negatives, you may fall from the top position quickly with little or no control. This is normal because your muscles are not yet adapted to this movement path. Keep practicing this and you will definitely have control during the eccentric! Perform this between 2-5 reps, for 4 set.

Back Lever Workout
Now, it’s time to walk you through how to structure and plan your back lever training! It is highly recommended that you train the back lever between 3-4 times per week to ensure that you get enough volume and plenty of rest for your body to recover from the damages that have been placed on it.
According to Harvard Health, strength training plays a role in slowing down the speed of bone loss, and several studies have shown it can even build bone. This is vitally helpful to help counterpoise age-related declines in bone mass.
A single session should consist of 4 exercises, and you should pick 2 exercises from the back lever progressions and 2 exercises from the back lever supporting exercises. Your rest time between sets is between 2-3 minutes per set – make sure to put a timer on! An example session would be:
- Skin The Cat (progression exercise)
- Tuck Back Lever hold (progression exercise)
- Back Lever Negatives (supporting exercise)
- Pull-Ups (supporting exercise)
If you are not yet able to hold the tuck back lever, you can reallocate the slot of exercises by choosing 1 exercise from the back lever progressions and 3 exercises from the back lever supporting exercises. For example:
- Skin The Cat (progression exercise)
- Back Lever Negatives (supporting exercise)
- Pull-Ups (supporting exercise)
- Hanging Leg Raises (supporting exercise)
Back Lever Variation
Front Lever
The front lever is another static hold that is performed on a bar or gymnastics ring. You will raise your body horizontally upwards until it is parallel to the ground whilst keeping your body rigid. Every muscle should be tensed! This exercise is an advanced level exercise and is much harder than the back lever due to it requiring a tremendous amount of core and lats strength. You can check out how to achieve the front lever by checking out this front lever tutorial.
The Takeaway: Back Lever Calisthenics
The back lever is an awesome calisthenics skill that looks cool and is great for developing that ripped gymnast physique. It is literally a full-body workout as you’ll have to squeeze your entire body in order to hold it in clean form. By using a combination of static and dynamic progressions in your back lever workouts, you’ll be setting yourself up for success. Be patient and the results will come. I recommend being able to hold any progression for at least 15 seconds for 4 sets before moving on to the next one.
If you’ve studied this tutorial but need further guidance on knowing where to start, what progressions to use next, and how to hold them, then you should book a consultation with me to find out specific exercises designed for you to train the back lever. This will prevent rookie errors by saving time and decreasing the risk of injury. Book a consultation and get coached by me, today!
All Power Move Exercises

I’m Pat Chadwick, a qualified Level 2 and Level 3 calisthenics coach and certified personal trainer from London, England. I have over six years of experience training students specifically in the art of calisthenics. I’ve competed in various UK competitions, including the Kalos Stenos Championships, where I achieved third place in the lightweight category. My passion is highlighting the beauty of calisthenics as an authentic and pure form of body expression. I believe that everyone has the potential to become a champion of their body and mind, and that calisthenics opens the door to personal empowerment.